![]()
HEI Ignition Upgrade for the AMC 258
![]()
| ~ ~ back to my home page ~ ~|
Since writing this section on the HEI Ignition Upgrade I have installed a Motorcraft TFI Ignition Upgrade. I would recommend the TFI Upgrade over the HEI Upgrade. I am leaving this on the site for anyone that still wants information to try the upgrade, but you would probably make better use of your time by doing the TFI Upgrade.
I am now on my third Jeep since
1984 [ ’75 CJ-5, destroyed – don’t ask; ’78 CJ-7, sold
during a divorce; ’85 CJ-8, “Always Wanted It - Not Going To Get Rid Of
This One” ] and they all had the AMC
258, I-6 engine. There always seemed that
something was lacking in the ignition systems. My
current Jeep has rough starts and is sluggish a various RPM levels. I considered the Howell-EFI [ ~ $1,100 ] and the MOPAR MPFI [ ~
$2,100 ], but just can’t bring myself to part with so much cash until I have tried
and tinkered with what I have or could get locally, cheap.
After looking at many of the web sites out there on the HEI conversion . . . .
Jeep 258 HEI Installation (by Jim O’Brien)
GM HEI Ignition Swap for a 258 (by Darren Perkins)
GM HEI Setup for the 258 with Crane Adjustable Vacuum Advance Kit (by Don Perkins)
258 HEI Installation Instructions (by Glenn Woodworth)
GM HEI Installation Upgrade (by Trick)
GM HEI Installation (by Jim O'Brien)
GM HEI Installation in a Buick 225 (by Mike Childs)
and talking with my local GM guys I
decided to do the infamous GM HEI distributor swap for my 1985 CJ-8 (the MIGHTY EIGHT,
thanks hobbs).
Those of you with a Jeep with the I-6, 258 should recognize the existing Ford distributor and coil:
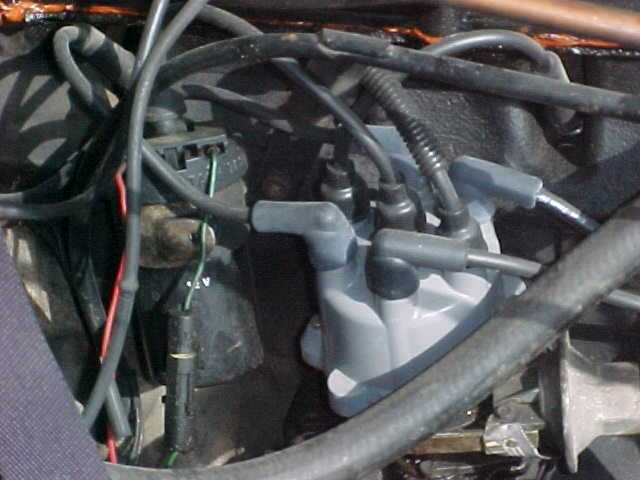
DISTRIBUTOR
The options are to purchase a new unit, a rebuilt unit, or a used unit. The new unit I priced was around $150 and the rebuilt unit was around $100. This was without the gear swap. I decided to go the local junkyard. Click here for a list of possible donor vehicles. You will be looking for a donor vehicle with a Chevy 250, I-6 engine. The local junkyard was supposed to be a “You-Pull-It” place. I told the guy what I needed and he said come back in about an hour and he would have the distributor for me. (Didn’t even have to ask – must have been a slow day) When I returned there were two distributors on the counter. Neither one was a complete unit, but he said that for $40 I could have both of them. I was pretty sure that between the two I could make one distributor work so I took them both for $40 without giving him time to think about charging me more.
The first distributor came from a 1980 Chevy C-10 pickup. This distributor was supposed to have the coil as part of the cap, but there was no cap or coil on the unit. It did not have a rotor and looked like it had been in the rain.
Here is a picture just like the guy gave it to me:
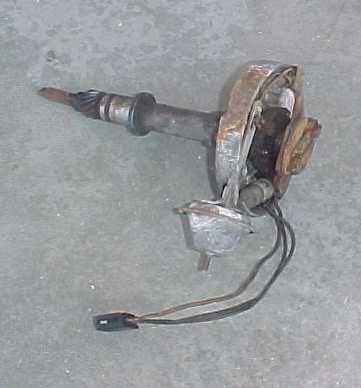
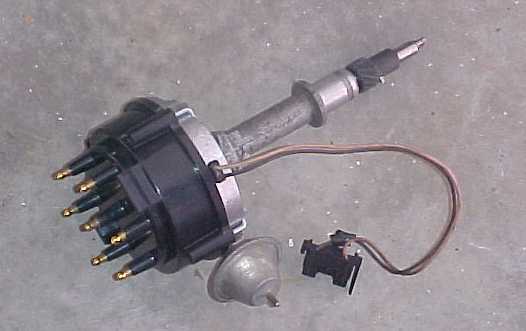
The second distributor came from a 1977 Chevy Nova. This distributor does not have the coil as an integral part of the cap and uses an external coil.
Here is a picture of the second one just like the guy gave it to
me:

After weighing my options I decided to go with the 1977 Chevy Nova distributor. Mostly because it was more complete and had all of the pieces and parts intact. I did not want to switch parts from one unit to another since I did have one complete distributor. That way I would not have to convert the cap later if I wanted to upgrade to a hotter MSD coil in the future.
The rest of this article describes the installation of a HEI distributor setup with an external coil. Most of the steps are the same as the internal coil. The web sites I referenced above can give you the particulars about the internal coil installation.
IGNITION COIL
Since I was going with the external coil setup with my conversion I had to find a coil for my distributor. The coil I used is listed for a 1977 Chevy Nova with the 250, I-6. I got this from my local NAPA store. This is basically a raw coil with a plug wire post on the top.
Here is a picture of the new coil:

The one problem I had is how to mount it to the firewall of my Jeep. I really did not want to go back to the junkyard for just a coil bracket, so I ended up using some 4" angle brackets and bolting it to the inside fender.
DISTRIBUTOR GEAR
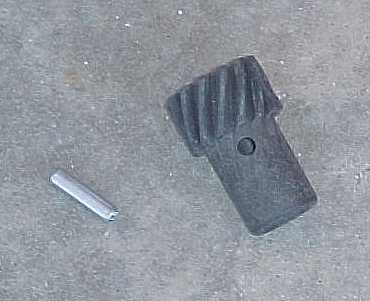
The distributor gear that is on the distributor will not work in the AMC engine. There needs to be a new gear installed on the HEI shaft. This new gear is from an AMC 360 engine (1979 and later). My local junkyard did not have any AMC engines lying around. The dealer wanted too much (~$65) for the MOPAR part. The MOPAR number is 3208615. I called the local NAPA shop and got it for $32. The NAPA part that worked for me was from a 1985 Jeep Grand Wagoneer with the AMC 360, part number BK655-1284. I have read that the distributor gear for the AMC 304 or the AMC 258 will work, but I am getting mixed responses whether the gear collar needs to be ground off, so I stuck with what I heard was tried and true.
Other sources for the distributor gear are Leon Rosser Jeep, Four Wheel Drive Hardware or Savannah Jones.
Here is what the part looked like from NAPA:
PLUG WIRES
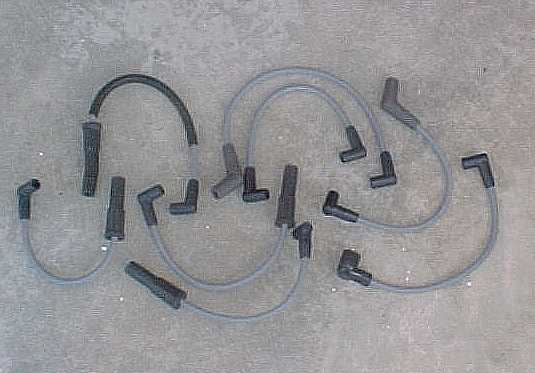
The existing spark plug wires will not work with the GM HEI cap. I went to my local parts house and got plug wires for a 1980 Ford F-150 with the I-6, 300 engine. I got these from the NAPA store as well. Make sure that you go with at least 8mm plug wires. The smaller wires will not carry the energy from the HEI setup. This Ford engine has a distributor on the center of one side of the engine similar to the AMC 258 and the plug wires work real well.
Here are the plug wires:
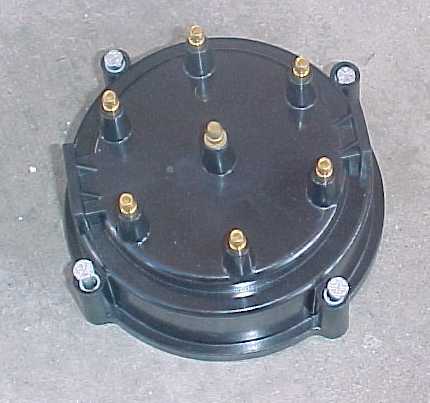
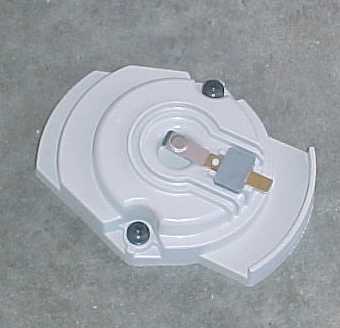
CAP & ROTOR
Since my cap was pretty much shot I decided to go with a new cap and rotor. Again, this is what is listed for a 1977 Chevy Nova with the 250, I-6. Even if yours look like they are in good shape, I would recommend getting new ones. It’s cheap and you just can’t tell how long yours were sitting in the yard. These came from the NAPA store as well.
Here is the cap & rotor:
MISCELLANEOUS PIECES AND PARTS
There will be a few other things that you will need. This list does not include everything, but I tried to include the major items:
· Vacuum Hose - Now is a great time to install a new length of vacuum hose for the advance unit.
· 12 Gauge Wire – To connect power to the new HEI coil.
· Carburetor cleaner and engine degreaser spray for cleaning the old distributor and around the engine and a little 30-weight oil for installing the gear as well as lubricating the advance springs and cams in the distributor.
After all of the parts and pieces were collected I began to get down to some real work. The guy at the NAPA store said he felt REAL SORRY for me for even trying to work on an AMC engine. Especially when I asked for the gear from an AMC 360; plug wires from a Ford 300; coil, cap & rotor for a Chevy 250; and the fact I was starting off with a distributor from a Chevy 250. “All this work just for a little old AMC 258”, he said. He made me promise to take the vehicle up to him when I finished just so he could get a picture of the engine and all of the leftover parts to prove to his buddies that he didn’t make up this story. But, I do have to thank Paul @ Paul’s Auto Supply – NAPA for all of his patience and assistance. THANKS!
CLEANING, PREPARATION & INSTALLATION
Cleaning the Distributor
I used spray carburetor cleaner and a rag to clean the inside of the distributor. I kept close attention to the ignition module, condenser, and wires so as not to get too much cleaner on them or they could get damaged. I used the old cap to keep the old outside dirt from getting into the interior of the distributor while I got the years of crud and dirt from the outside distributor. The spray carburetor cleaner and a wire brush work well for this. When I finished all of the cleaning I gave he advance springs a little lubrication with some 30-weight oil.
Installing the New Distributor
Gear
The next step was to replace the distributor drive gear. There is a pin in the gear that holds it on the distributor shaft. Remove this pin with a punch and install the new gear on the shaft and install the new pin. It is a good idea to keep the old cap on the distributor while you are doing this to protect the distributor internal components. Put a little oil on the shaft where the new gear is to be installed. This will make it easier to slide the new gear into place. The gear that I have uses a pin that has to be ground down after installation. I used my trusty Dremel tool to grind the pin smooth with the gear. Put a little oil on the shaft and make sure that the rotor shaft will turn freely.
Here is a picture of the distributor ready for installation:
I scribed a mark on the distributor housing (with the cap installed) where I wanted the position to be for the number 1 plug wire. This will make it easier for me to line up the rotor on 0 deg. TDC when I install the distributor.
I marked on the stock distributor where the rotor makes contact with the number 1 spark plug position of the cap. I removed the low side and high side wires from the stock coil. I used a screwdriver to engage the starter switch to pulse the engine until the rotor approached the number 1 plug position and lined the timing mark with 0 deg. TDC. I had to do this a few times to get the timing mark on 0 deg. TDC.
Another way to find 0 deg. TDC is to place a wine cork (or the finger of a second person) in the number 1 spark plug hole. Don't force the cork into the hole, we want it to be able to come out when the piston compresses. Place a wrench or socket on the vibration damper's bolt, rotate the engine clockwise until the wine cork pops out so you now know this is the compression stroke of the number 1 cylinder. Continue turning until the timing mark shows 0 deg. TDC. Make sure you have not made a complete 360 degree turn. If you did go past 0 deg. TDC, this will be the exhaust stroke and you will need to start over. Thanks to Larry Maggio for this paragraph.
Removing the Old Distributor
Loosen the distributor hold down clamp and lift the stock distributor straight out. If you have some problems or it seems to be stuck give it a little tap with a hammer to loosen it.
Installing the Distributor – Determining the Position of Plug Number 1
As I mentioned above I scribed a mark in the distributor housing where I wanted position Number 1 to be. It really does not matter at this point since the engine is at Number 1, 0 deg. TDC. Whatever position on the cap that the rotor points to will be Number 1 plug position. Turn the rotor to line up with the scribe mark. Rotate the rotor one tooth counter-clockwise to compensate (this will be about 1/8 of a turn) for the rotation of the shaft (due to the helix on the gear) when the distributor is installed. When the distributor is installed in the engine the rotor will rotate back to the scribe mark.
The shaft of the distributor is also what turns the oil pump. Look at the position of the end of the shaft and use a screwdriver to rotate the oil pump (in the engine distributor housing) to line up with the end of the new distributor. Insert the new distributor. It should go in fairly smooth and easy. If you are having problems you probably do not have the oil pump or the drive gear properly lined up. After the new distributor is installed tighten the hold down clamp.
Note: Remember to mark the plug wire positioning on the new cap... often they are marked from the factory... by rotating the distributor and using a position not factory, it could get very confusing, especially if you take the Jeep to another mechanic who spends some time thinking position 5 is position 1... and then tears apart your timing case to “cure” the problem! Thanks (again) to Larry Maggio for this paragraph.
Wiring the Distributor and Coil
The distributor you have may or may not have a coil connector attached. If it does, just plug it into the low voltage side of the coil. If not, refer to the diagram below. On most GM HEI coil applications as you are looking at the terminal ends of the coil with the tower on top and the terminals on the bottom, the positive (+) side is on the right and the negative (-) is on the left. The Orange connects to the Positive (+) side on the right and the Yellow or Brown connects to the Negative (-) side on the left.
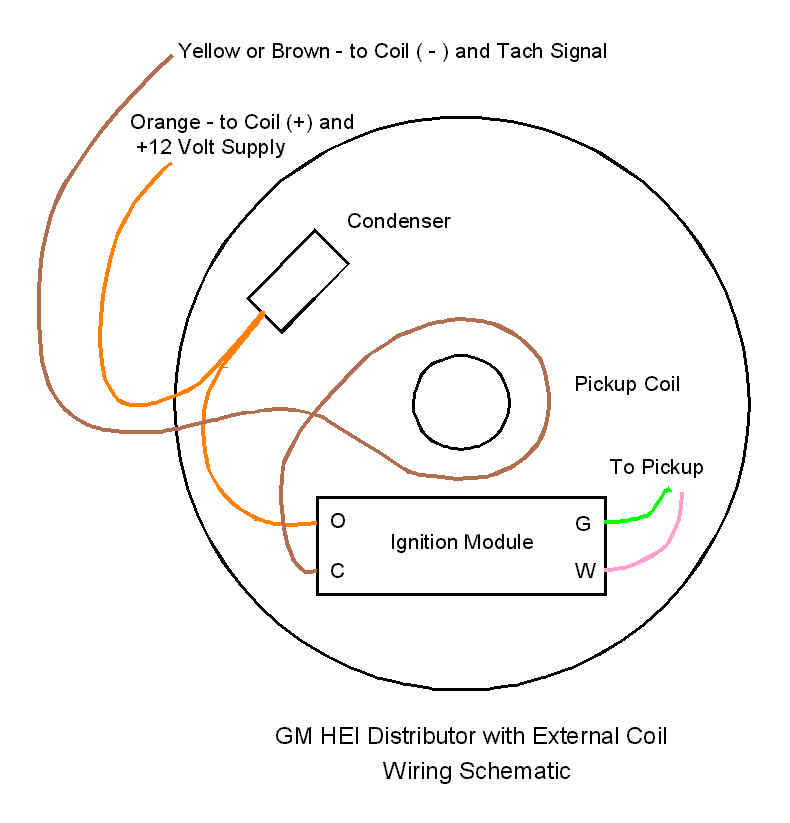
The next step is to connect a 12 volt supply to provide voltage to the distributor, ignition module, and coil. This must be a 12 volt supply in the start and run positions of the ignition switch. The place that I found worked the best for me was in the circuit that provides voltage to the stock ignition module. This module is located on the driver's side fender wall usually below the radiator overflow reservoir. There should be two plastic plugs that connect the module to the rest of the Jeep wiring harness. One plug comes from the computer and the keyed ignition voltage supply and the other provides signal to the stock distributor. You want to follow the red power source wire that connects to the wiring harness. The red wire that feeds the stock ignition provides a reduced voltage (~9.6 volts) to the coil and distributor while the engine is running. The voltage source wire needs to connect to a 12 volt source that will provide the appropriate voltage for the HEI distributor during start and run.
Here is a schematic of the stock ignition circuit and where you would connect the voltage for the HEI Distributor:
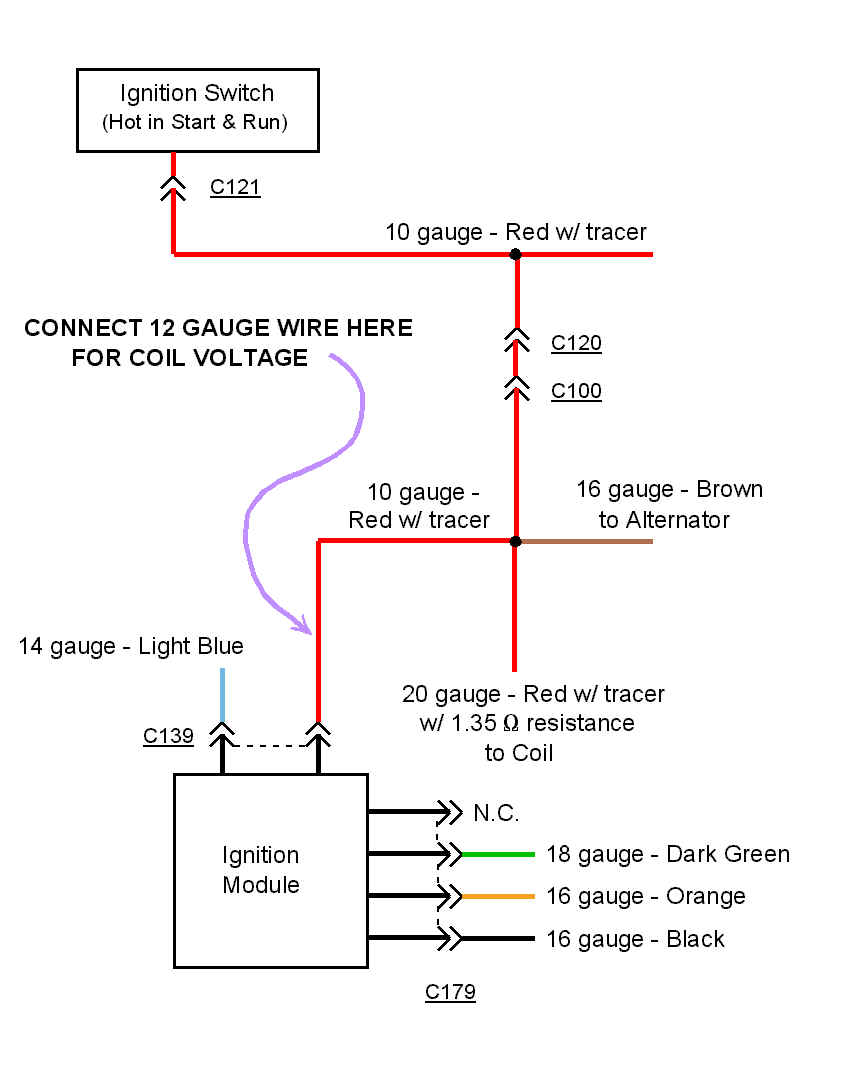
I used 12 gauge stranded wire. It is best to solder and seal this connection well. I live near a river and close to the ocean, so moisture and salt can be a problem for electrical connections. After I soldered the connection I covered it in liquid wiring sealer and electrical tape. This liquid sealer can be purchased at the "You Find It" auto parts stores or "Mega-Stores", usually around the electrical supplies or the boat supplies. It comes in a small can with an applicator brush attached to the top. This stuff is great, you just goop it all over whatever you want to keep water tight.
Putting It All Back Together
I gapped the spark plugs to 0.045" and re-installed. Re-install or replace the vacuum hose from the vacuum port off the manifold to the distributor advance unit. You will probably need to use a tee in the manifold vacuum line.
STARTING UP AND ADJUSTMENT
After all of this is finished, start up the engine and adjust the timing. Have everything ready the adjust the timing since the distributor is probably not lined up exact and you want to keep the engine from running bad for an extended period of time.
When I started my Jeep the timing was pretty off. You should be able to turn the distributor to where the engine sounds good and let it warm up before you try to fine tune the timing. It is now set at 9 deg. BTDC at 1600 RPM. This is the setting on the emissions label for a 1985 Jeep with Automatic Transmission.
My Jeep now starts and runs great. I have not found any hesitation or dead spots. I also did the Nutter Bypass at the same time. This should do until the Weber carburetor upgrade to help with the Carter BBD problem.